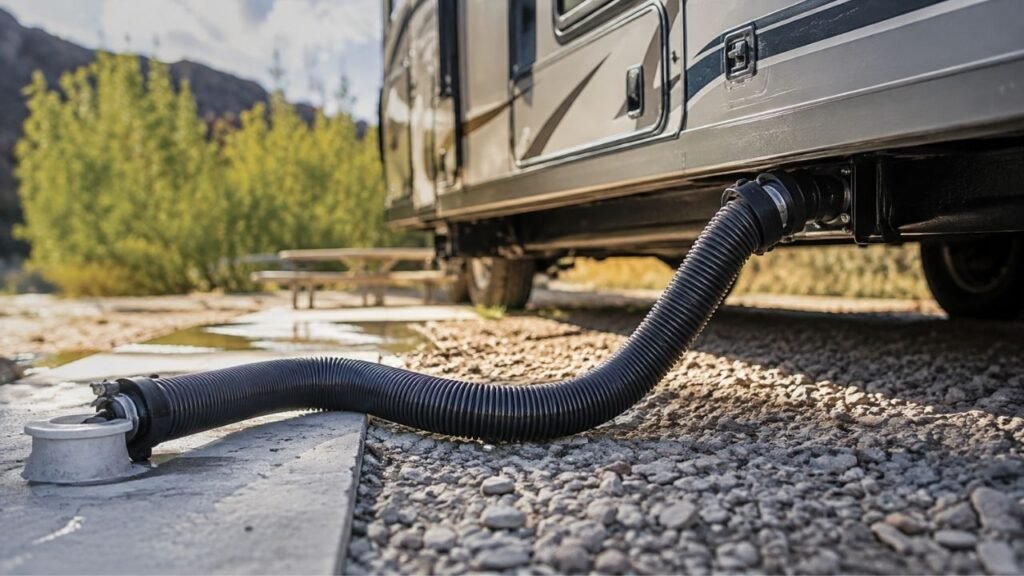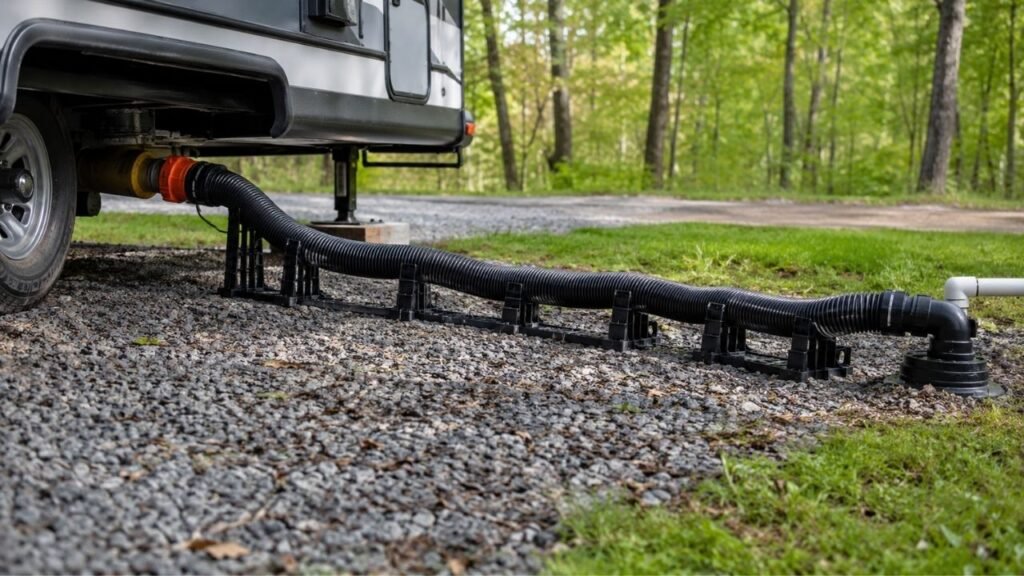
To position an RV sewer hose support on uneven ground, start high near the RV waste outlet and gradually lower the support toward the campground sewer inlet. Adjust individual sections as needed so the hose maintains a continuous downhill path without dips, bellies, or uphill sections.
Uneven gravel, grass, roots, curbs, and sloped campsites can make that harder than it sounds. I’ll show you how to build a reliable hose path, correct low spots, secure the support, and handle situations where gravity simply cannot do the job.
Key Takeaways
- Start with the highest support point near your RV sewer outlet.
- Gradually lower the hose support toward the campground sewer inlet.
- Never allow the hose to dip and then climb uphill again.
- Adjust the support to the terrain instead of following ground contours.
- Use stable leveling blocks beneath low support sections when necessary.
- Remove unnecessary hose length that creates sagging or extra bends.
- Recheck the setup after wastewater enters the hose.
- A sewer support cannot overcome an inlet that sits truly uphill.
Why Does Sewer Hose Position Matter More on Uneven Ground?
Your RV sewer system depends mainly on gravity. Once you open the holding-tank valve, wastewater needs a clear downhill path from your RV to the sewer connection.
A sewer hose support helps create that path.
The problem is that uneven campsites naturally create high and low areas. If you simply place your hose support directly on the ground, the support may copy those same dips.
That can leave wastewater sitting inside the hose.
One small low spot may not look serious while the hose is empty. Once wastewater fills the hose, however, that low section can become much more noticeable.
Standing wastewater can lead to several frustrating problems.
You may notice slow draining, unpleasant odors, leftover liquid after dumping, or a messy surprise when disconnecting the hose.
Soft ground adds another problem. A support that looked perfect during setup may slowly sink into grass, loose gravel, or wet soil.
That is why I recommend looking at the hose line, not just the support underneath it.
Your goal is simple:
RV outlet → continuous downhill path → campground sewer inlet
If you can maintain that path, the uneven ground underneath matters much less.
How Do You Position an RV Sewer Hose Support on Uneven Ground?
The easiest approach is to build the sewer hose path from your RV toward the campground inlet. Start by comparing both connection heights, then adjust each support section so the hose becomes progressively lower as it approaches the drain.
1. Inspect the Campsite Before Extending the Hose
Before connecting everything, take a quick look at the ground between your RV and the sewer inlet.
Check for:
- Gravel depressions
- Soft grass
- Tree roots
- Rocks
- Drainage channels
- Concrete curbs
- Steep slopes
- Raised sewer connections
Also compare the height of your RV’s waste outlet with the campground sewer inlet.
That quick inspection can save plenty of repositioning later.
You may discover that moving the sewer hose six inches to one side avoids a deep rut entirely.
2. Use the Shortest Practical Hose Route
Avoid using more sewer hose than the campsite requires.
Extra hose length creates more places where wastewater can collect.
If your campground connection is eight feet away, extending twenty feet of hose usually creates unnecessary curves and low spots.
Keep the path reasonably direct.
However, don’t stretch the hose extremely tight. You still want enough flexibility that normal movement doesn’t pull on either connection.
Avoid unnecessary loops, sharp bends, and S-shaped routes.
The simpler the hose path is, the easier it becomes to maintain proper drainage.
3. Place the High End Near the RV Outlet
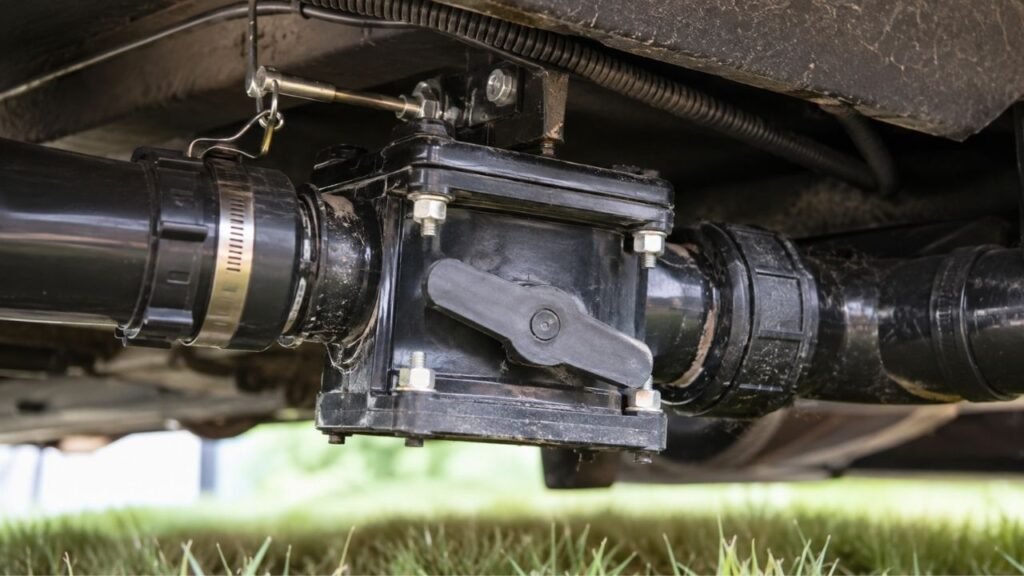
Your first support section should sit close to the RV sewer outlet.
You don’t want the hose dropping toward the ground immediately after leaving the RV and then climbing back onto the support.
That creates a trap before the wastewater even gets moving.
Set the RV-side support high enough to comfortably cradle the hose just below the waste outlet.
Don’t force the hose upward into the connection.
The support should carry the hose’s weight without pushing hard against the RV fitting.
4. Extend the Support Toward the Sewer Inlet
Now work from the RV toward the campground sewer connection.
Each part of the hose should become progressively lower.
Don’t worry if the ground itself rises and falls.
Your support’s job is to compensate for those changes.
For example, suppose the ground contains a shallow depression halfway between the RV and sewer connection.
Don’t lower your support into that depression.
Raise that section enough so the hose continues along the same downhill path.
Think about the hose as an imaginary ramp suspended above the campsite.
The ground underneath can be irregular. The hose itself should remain consistently downhill.
5. Raise Low Sections Individually
Uneven campsites rarely require you to raise the entire support.
Usually, one or two sections cause the problem.
You can correct those sections using:
- Built-in support adjustments
- RV leveling blocks
- Stable support pads
- Adjustable support legs
- Additional trough sections
Make small changes first.
Raising one troublesome section by an inch may remove the entire low spot.
Avoid stacking random rocks, firewood, or unstable objects underneath the support. They can shift once wastewater adds weight to the hose.
6. Remove Every Dip and Uphill Section
Now stand beside the hose and visually follow it from the RV toward the sewer inlet.
You are looking for anything resembling this:
high → low → high → low
That means wastewater must travel downhill and then uphill again.
Instead, you want:
high → lower → lower → lowest
Small curves from side to side are generally less important than vertical dips.
The main issue is elevation.
If one section drops below the next section, raise that low spot until the uphill portion disappears.
7. Secure the Support Before Dumping
Once the slope looks right, make sure the support cannot easily move.
Some hose supports include straps, stakes, clips, or locking mechanisms.
Use them when appropriate.
On gravel or concrete, stakes may not be possible. In that situation, focus on creating a wide and stable base.
On soft ground, make sure narrow support feet cannot sink easily.
Give the support a gentle push before dumping.
If one section rocks, slides, or collapses under light pressure, stabilize it before opening your tank valve.
How Should You Position Different RV Sewer Hose Supports?
Not every sewer hose support works the same way. Accordion supports, independent sections, adjustable troughs, and homemade rigid channels all require slightly different positioning on uneven campsites.
Accordion-Style Sewer Hose Supports
Accordion supports are among the most common choices for RVers.
They expand underneath the sewer hose and usually provide support through most of its length.
Start with the taller end toward the RV.
Then stretch the support toward the sewer connection.
You don’t necessarily have to extend it completely.
Extending only what you need often gives the support better stability.
On uneven gravel or grass, watch the individual feet closely. One foot sinking into a depression can pull several nearby sections downward.
If needed, place a stable leveling block underneath the affected area.
Independent or Sectional Supports
Independent supports give you more freedom on extremely uneven ground.
Because each section can be positioned separately, you can change elevation around roots, rocks, holes, and campsite drainage channels.
Start with the first section beneath the RV outlet.
Then place the remaining sections wherever the hose requires support.
Don’t automatically position them at identical distances.
Instead, watch the hose.
If a section begins sagging between two supports, either move them closer together or add another support point.
Adjustable-Leg or Trough Supports
Adjustable trough systems can be especially useful when campsite elevation changes quickly.
You can raise individual legs instead of stacking blocks under the entire system.
Set the RV-side section first.
Then adjust each following section until the trough creates a smooth downhill path.
Once you’re satisfied, verify that every leg is firmly planted.
Tall adjustments can become less stable, especially on soft ground.
DIY Gutter or Rigid Trough Supports
Some RVers use sections of vinyl rain gutter or another rigid trough to cradle their sewer hose.
This can work well when the trough itself receives proper support.
However, don’t assume a rigid gutter automatically prevents sagging.
A long unsupported gutter can bow in the middle once the sewer hose becomes heavy.
Support the trough at enough points to keep its own shape consistent.
How Do You Position a Sewer Hose Support on Different Ground Types?
Each campsite presents slightly different challenges. The goal remains the same, but how you stabilize and adjust the support depends on what’s underneath it.
| Ground Condition | How to Position the Support | What to Watch For |
| Gravel | Raise sections sitting inside depressions and create firm footing | Loose gravel settling under support feet |
| Soft grass | Use wider pads or leveling blocks beneath vulnerable sections | Supports slowly sinking during your stay |
| Ground sloping toward sewer | Use the natural slope while correcting smaller dips | Excessive drop or unstable supports |
| Ground sloping toward RV | Artificially raise the middle and sewer-side sections where possible | Hose following the wrong direction |
| Ruts or potholes | Bridge over the depression instead of following it | Hidden hose bellies |
| Tree roots or rocks | Route around obstacles or raise nearby sections | Sharp bends and unstable contact points |
| Concrete curb | Bridge or step the support over the curb gradually | Hose pinching against the curb |
| Raised sewer inlet | Compare both connection heights carefully | A true uphill final section |
How Much Slope Does an RV Sewer Hose Support Need?
You may see exact sewer hose slope numbers repeated online, but RV sewer hose systems and support designs vary considerably.
For normal campsite use, focus first on creating a continuous downhill fall.
You should be able to visually follow the hose toward the sewer connection without finding a section that drops and then rises again.
You don’t need an extremely steep slope.
In fact, making the support unnecessarily steep can create other problems. Tall support sections may become unstable, fittings can receive additional strain, and the hose may shift more easily during a strong tank dump.
A moderate, continuous downhill path is usually what you’re trying to achieve.
Remember that flexible RV sewer hose doesn’t behave exactly like rigid household drainpipe.
Your biggest enemy is usually not a tiny difference in slope.
It’s the obvious belly sitting halfway across the campsite.
How Far Apart Should RV Sewer Hose Supports Be?
There isn’t one support-spacing number that works for every sewer hose support design.
An accordion support may cradle almost the entire hose.
Independent stands support the hose only at selected locations.
A rigid gutter requires enough support to prevent the gutter itself from sagging.
Instead of relying only on a measurement, check these things:
- Follow the manufacturer’s intended support layout.
- Add support anywhere the hose develops a visible belly.
- Give heavy fittings adequate support.
- Support areas where the hose changes direction.
- Avoid leaving long unsupported sections.
- Recheck the hose after wastewater adds weight.
If your hose starts sagging between two support points, those supports are too far apart for that particular setup.
Let the actual hose tell you when additional support is needed.
How Can You Tell Whether the Sewer Hose Slope Is Correct?
You don’t need specialized measuring equipment for most campsite setups. A careful visual inspection usually reveals the problems that cause poor drainage.
Use this quick check before dumping:
- Follow the hose visually from the RV toward the sewer.
- Look for obvious U-shaped bellies.
- Check whether any section rises after dropping.
- Inspect the final few feet near the sewer elbow.
- Make sure fittings aren’t carrying the hose’s weight.
- Check that support sections don’t rock or slide.
- Make sure excess hose isn’t piled near either connection.
- Recheck the support after rain or soft-ground settling.
When possible, you can also test the hose path using a small amount of gray water.
Watch how it moves through the hose or a clear sewer elbow.
If water stops inside a section, inspect that section for a hidden low spot.
It’s much better to discover the problem with a small amount of gray water than during a full black-tank dump.
Why Does My RV Sewer Hose Still Hold Water Even With a Support?
A hose support greatly improves drainage, but it doesn’t automatically guarantee a perfect hose path. If water remains inside the hose, work through these common causes before blaming your holding tank.
The Support Has Settled Into the Ground
Soft soil, wet grass, and loose gravel can slowly move under the support.
What looked perfect when you arrived may develop a dip several hours later.
Raise the affected section and create a firmer base underneath it.
You’re Using Too Much Sewer Hose
Extra length commonly creates sagging.
Shorten the extended hose until you have enough length for comfortable connections without unnecessary loops.
The Sewer Elbow Is Too High
Inspect the final section near the campground sewer inlet.
Sometimes the hose slopes beautifully for fifteen feet and then suddenly climbs upward into a tall sewer elbow.
That last uphill section can trap wastewater.
Adjust the final support or connection so the transition remains as smooth as possible.
One Support Section Is Too Low
A single low support can create a wastewater pocket.
Follow the hose carefully instead of inspecting only the support itself.
Raise the problem section until the hose stops forming a U shape.
The Hose Is Sagging Between Supports
This commonly affects independently positioned support stands.
If the hose droops between two support points, move those supports closer or add another support section.
Remember that a hose becomes heavier once wastewater enters it.
The Campground Sewer Inlet Is Too High
Sometimes your support isn’t the real problem.
The campground sewer inlet may physically sit higher than your RV’s waste outlet.
When that happens, gravity may not be able to empty the hose completely.
What If the Sewer Inlet Is Higher Than the RV Outlet?
A sewer hose support can control the path of the hose, but it cannot make wastewater flow uphill when the campground inlet is genuinely higher than your RV outlet.
First, confirm that you’re dealing with a true elevation problem rather than a simple hose dip.
Stand back and compare the two connection points.
If the campground inlet is only creating a problem near the final section, adjusting the support may still help.
If the entire destination sits higher, consider these options:
- Shorten the hose route if possible.
- Reposition the RV when campground rules allow.
- Choose another sewer connection if available.
- Raise intermediate sections only when a downhill endpoint still exists.
- Drain remaining hose contents carefully after dumping.
- Consider an RV macerator system when gravity drainage isn’t practical.
Don’t keep stacking the support higher and higher trying to overcome impossible geometry.
If the sewer inlet is above the RV outlet, raising the middle of the hose doesn’t change the height of those two endpoints.
Common RV Sewer Hose Support Positioning Mistakes
Most drainage problems come from a few repeat setup mistakes. Checking these before dumping can save you from a messy campsite problem.
- Allowing the support to follow every ground depression.
- Putting the taller end toward the sewer instead of the RV.
- Leaving the first section below the RV outlet unsupported.
- Extending far more sewer hose than necessary.
- Creating a U-shaped trap in the middle.
- Balancing supports on rocks or unstable objects.
- Letting heavy fittings carry the hose.
- Ignoring support movement after heavy rain.
- Assuming all support styles need identical spacing.
- Trying to solve a truly uphill sewer inlet using supports alone.
One of the easiest mistakes to make is concentrating too much on how neat the support looks.
A perfectly straight support isn’t necessary.
A continuously descending hose is.
Should You Leave the Sewer Hose Connected on Uneven Ground?
You can leave your sewer hose connected during a full-hookup stay when campground rules allow it, but the support needs occasional attention.
Keep your black tank valve closed until you’re ready to dump.
Leaving the black valve open can allow liquid to drain while solids remain behind inside the tank.
Your sewer support also deserves another inspection during longer stays.
Rain can soften soil. Vehicles can vibrate nearby gravel. Wind can move lightweight components. Even repeatedly walking beside the support may shift it slightly.
A quick visual check every so often helps catch a new low spot before it becomes a problem.
Sewer Hose Safety Tips Before You Dump
A proper support setup protects drainage, but safe sewer handling is just as important. Before opening a tank valve, run through a few basic checks.
- Wear disposable gloves.
- Confirm your sewer hose connections are secure.
- Make sure the campground inlet fitting is properly seated.
- Keep sewer equipment separate from freshwater equipment.
- Verify that your support is stable.
- Check the entire hose for visible leaks.
- Dump the black tank before the gray tank.
- Use gray water afterward to help rinse the hose.
- Follow any additional campground sewer rules.
Never open the valve simply because both ends appear connected.
Take another few seconds to look at the hose path.
That short inspection can prevent a much longer cleanup.
Final Words
Positioning an RV sewer hose support on uneven ground isn’t about making every support section perfectly level or evenly spaced. You’re creating one dependable downhill route from your RV’s waste outlet to the campground sewer connection.
Start high, finish low, and correct every dip you find along the way. If the campsite changes elevation, make the support compensate for the terrain rather than letting your sewer hose follow every rut and bump.
Once the hose is connected, stand back and trace its path visually.
If you can follow the hose from your RV to the sewer without finding a dip followed by another rise, you’ve probably built the drainage path you need.
Related FAQs
Does an RV Sewer Hose Have to Slope Downhill?
Yes. An RV sewer hose depends on gravity during normal dumping, so it should maintain a continuous downhill path from the RV outlet toward the sewer inlet without low spots that trap wastewater.
How High Should an RV Sewer Hose Support Be?
There isn’t one correct height because campsite terrain and RV outlet heights vary. Start just below the RV waste outlet and gradually lower the support toward the sewer connection.
Can an RV Sewer Hose Go Uphill?
A standard gravity-fed RV sewer hose cannot reliably move wastewater uphill. Small rises can trap liquid, while a sewer inlet significantly above the RV outlet may require a macerator system or another solution.
Can I Put Leveling Blocks Under a Sewer Hose Support?
Yes. Stable RV leveling blocks can help raise low sections of a sewer hose support on uneven ground. Make sure the blocks sit firmly and cannot easily shift once the hose fills.
How Do I Keep My RV Sewer Hose From Sagging?
Support the hose wherever it begins developing a belly, avoid unnecessary hose length, and adjust individual support sections so the hose remains continuously downhill toward the campground sewer inlet.
Do RV Sewer Hoses Have to Be Off the Ground?
Requirements vary by campground, but a support helps keep the hose elevated, improves drainage, reduces sagging, and may help you comply with campground rules requiring supported sewer connections.
Can I Use a Rain Gutter as an RV Sewer Hose Support?
Yes, many RVers use rigid vinyl gutter sections as hose troughs. The gutter still needs adequate support underneath so it doesn’t bow and create another low spot when the hose becomes heavy.
Why Does Water Stay in My RV Sewer Hose After Dumping?
Remaining water usually indicates a low spot, excess hose length, sagging between supports, a raised sewer elbow, or a campground sewer inlet that sits too high for complete gravity drainage.
Can I Use a Sewer Hose Support on Gravel?
Yes. Sewer hose supports work on gravel, but individual feet can settle into loose areas. Check the support after setup and use stable leveling blocks beneath sections that begin sinking.
Should the Tall End of a Sewer Hose Support Face the RV?
For supports designed with a tall and short end, the taller end generally faces the RV outlet while the lower end points toward the campground sewer inlet, creating the downhill drainage path.

Steven Parker writes about everyday RV life, from setup tips to long-term living decisions. His content reflects a calm, experienced approach to RV ownership and travel. He focuses on comfort, reliability, and realistic expectations.